This post may contain affiliate links which means I may receive a commission for purchases made through links. Learn more on my Private Policy page.
Tame Your Belt Sander: A Comprehensive Guide
Introduction
In woodworking, a belt sander is a powerful tool that can help you achieve smoother surfaces and save time and effort. Unfortunately, some woodworkers shy away from using belt sanders due to their power and aggressiveness. This guide aims to help you master the art of using this machine, ensuring that you’re integrating it into your workshop routine whenever required.
Belt Sander Shopping: Factors to Consider
If you’re in the market for a belt sander, consider the following features when making your decision:
Size
Bigger is better when it comes to belt sanders. A larger sander, such as a 4×24 model with belts that are four inches wide and 24 inches long, provides a wider work surface and minimizes the risk of the sander racking. This ultimately makes it easier to hold the sander flat and achieve optimal results.
Variable Speed
Having a variable-speed motor controlled by a dial allows you to fine-tune the speed of your belt sander. Slower speeds make the sanding process less aggressive and reduce the risk of causing damage to your material. This is particularly helpful when working with delicate materials such as veneer.
Coarse vs. Fine Belts
When learning to use a belt sander, start with a fine belt. This will allow for slower stock removal and help you avoid making mistakes that could ruin your project. As you become more experienced, you may choose to use coarser belts for faster removal.
Dust Collection
Good dust collection is essential in maintaining a clean and healthy workshop. Connect your belt sander to a vacuum with a tool-actuated outlet. This ensures that the vacuum will automatically switch on when the sander is in use, capturing dust at the source.
Working With Your Belt Sander
Setting Up Your Project
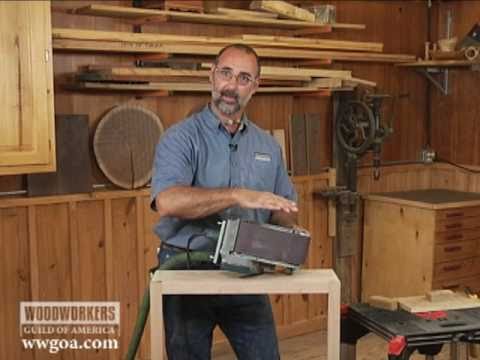
Position your workpiece on a low surface, such as a shop stool. This allows you to maintain a comfortable posture while sanding and ensures that you have maximum control over the movement of the sander.
Starting Your Sanding Passes
Begin with the sander’s platen about halfway off the end of your material. Lift the sander, turn it on, and gently lower it onto the workpiece, as if you were landing a plane. Make a pass in the direction of the wood grain, then return to the start and make another pass, moving over slightly each time. Overlap each pass by about half the width of the platen to ensure an even sanding.
Monitoring Your Progress
To keep track of how much material you’re removing, use a pencil to draw lines across the surface of the wood. This allows you to see whether you’re taking off an equal amount of material across the entire surface, helping you avoid sanding too deeply in certain areas.
Managing Cords and Hoses
Keep cords and vacuum hoses out of your way by slinging them over your shoulder while sanding. This prevents accidental damage and allows you to focus entirely on the sanding process.
Cleaning Your Sanding Belts
Over time, sawdust and debris will build up on your sanding belts. This can be particularly problematic when sanding glue residues, which can melt and adhere to the belt when heated. To maintain the effectiveness of your belt sander, use an abrasive cleaning stick made of crepe material to clean your belts frequently.
To make this process easier, attach the cleaning stick to a board and clamp the board to a table. With the sander running, gently press the belt against the cleaning stick to remove any built-up debris. Regular cleaning will prolong the life and performance of your sanding belts, saving you money in the long run.
Conclusion
With the right techniques and a little practice, anyone can become a master at using a belt sander. By choosing the right sander, using appropriate sanding belts, proper setup, and regularly cleaning your belts, you’ll be able to make the most of this versatile and powerful woodworking tool in your projects. Remember, practice makes perfect—so don’t be afraid to pick up that belt sander and start working towards mastery.
This post may contain affiliate links which means I may receive a commission for purchases made through links. Learn more on my Private Policy page.


Very informative and well presented video. Just bought a belt sander to prep deck for restaining.
Great video. Many good tips
This is exactly what I needed for trimming the edge of oak boards MyBest.Tools I also used the disk to round edges while building an oak – walnut cabinet.
Thank you! What do do when the paper keeps running off track towards the sander opposite of the side it is interested? There’s no adjustment knob.
Would it work on steel and can i use winding stick on wood on metal
Cool cool. I knew you had to sand with the grain but i watched this video in case there was anything else I didn't know about, and it was worth it for the pencil trick. Thanks 🙂
Thank
Excellent video. Extremely clear and very helpful tips. I had no idea abrasive cleaning sticks existed, so I’m really pleased I watched. Thanks!
I have a question. I can do an excellent job with a belt sander, untill i get to higher (smoother) grits than p120. After that i start getting dimples horseshoe marks and score. The solution ive been using is just to orbital sand past this point. But why on earth can i do it perfectly with 120 belts and coarser, but as soon as i go 180 i cant. V confusing.
Or you could just not make that cabinet flush at the bottom and never have to worry about doing this 😉
thank you
You didn’t show how to change the belt of work the tensioner to keep belt on.
I love the pencil trick and the cleaning stick use, both new to me and valuable. Thank you.
I have random orbital sander quarter sheet sander and a detail sander. Do I really need a belt sander? Only asking because I have a belt sander that’s broken and just wanted to know if it’s worth replacing. Love your videos.
Thanks for the tip, I use 220 most of the time, takes me longer, but I normally won't burn through.
Awesome video, thank you!
Belt sander master…awesome video
I've wasted thousands of dollars on belts. Didn't know you could clean the belts😟
This title is too vague. Please edit it. Teaching on point. Could easily drop 2 minutes, if you write out key points cut out some of the sanding 😉
Good tips, trying to figure out how to use a belt sander as I've never had one. I'd never heard of the abrasive cleaning sticks, good to know!
Good video used a belt sander for years. but these cleaning sticks make the belt look good and that is all sanding time is increased as if you had done nothing. I find this to be a placebo. If you pay for the time it's not worth it get a new belt.
When you are sanding how much pressure are you applying?
Great video for a novice
Some good tips. I’d like to see how you adjust the belt in the sander. I am noticing my sander is not sanding evenly across its width
Great video. Thank-You very much.
Question: does one need an expensive belt sander ?
Why didn't they design the sander to roll backward to counter the natural motion of a user's pushing forward?
I prefer to build with stodoys.