This post may contain affiliate links which means I may receive a commission for purchases made through links. Learn more on my Private Policy page.
DIY Spinning Bowl Sander: A Simple and Effective Solution for Sanding Bowls
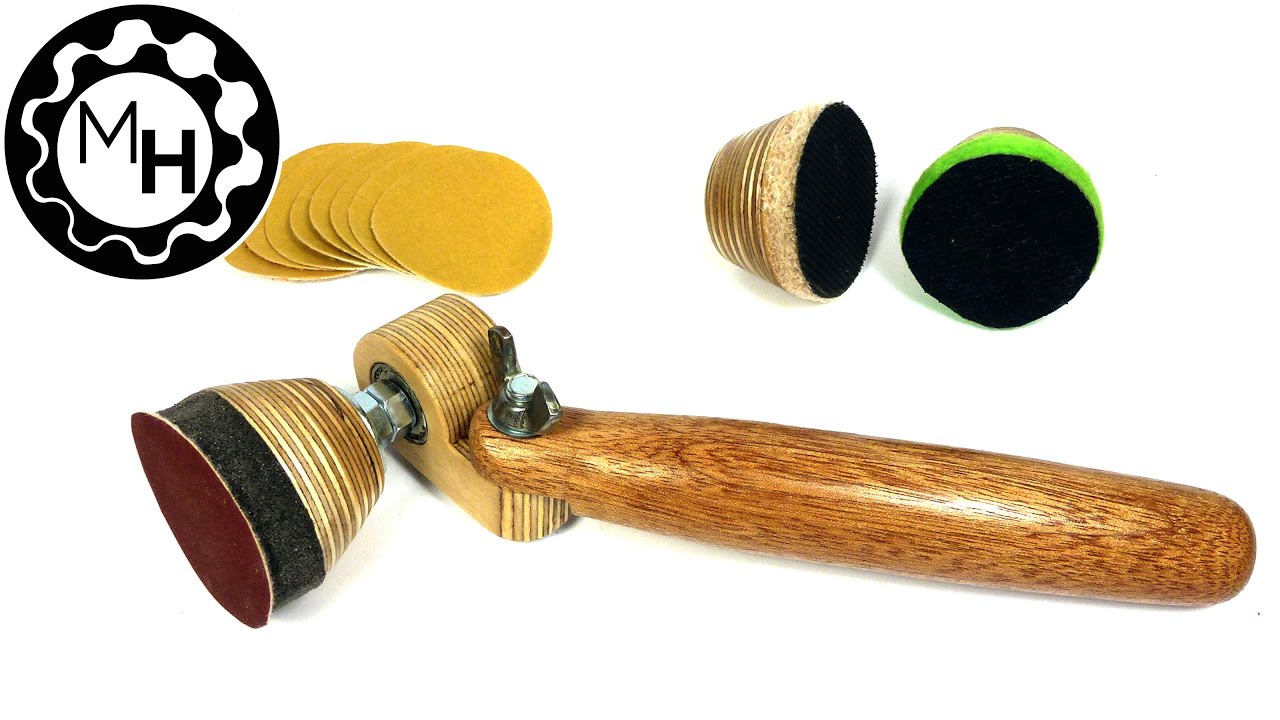
Whether you’re a woodworker or a DIY enthusiast, sanding is an essential step in creating a smooth and professional-looking finish. In this article, we’ll introduce the spinning bowl sander, a simple yet efficient tool for sanding bowls that can be easily made at home using basic materials. A video tutorial detailing the entire process can be found here, while a link to free downloadable templates for this project can be found in the video description. Let’s dive into the steps involved in making your own spinning bowl sander.
Requirements and Materials
Materials needed for building the sander include plywood, sandpaper, foam, velcro, bearings, bolts, nuts, washers, and glue. In addition to these basic materials, you will need several woodworking tools such as a drill, lathe, chisel, and Forstner bit, among others. The templates provided in the video description include detailed instructions on how to build the sander, so please refer to those for additional information.
Assembling the Spinning Bowl Sander
The first step is to cut and glue the plywood pieces together following the templates provided. Make sure to cut them roughly with about a 3-millimeter overhang for a smooth finish. While the glue dries, you can work on other parts of the process.
Creating the Sanding Pad
Draw a 50-millimeter circle on some more plywood and cut it out. To attach the pad on the arbor, you will need to embed a nut between two layers of plywood when gluing them together. Hammer the nut into a hole in the smaller circle, then glue the two pieces together.
Assembling the Arbor
The arbor is made of a bolt, two bearings (usually taken from rollerblade wheels), spacers, two nuts, and a thick washer that acts as a flange. Make sure to select a thick washer as it improves stability during use.
Drill holes to accommodate the bearings and make sure they fit snugly by adding a layer of tape around them if necessary. Assemble the arbor by placing the first bearing on one side, the second bearing on the other side, and then lock them using a nut. A spacer should be placed between the bearings to prevent them from locking when the nut is tightened. Finally, lock the second nut into the first nut to complete the assembly.
Attaching the Sanding Pad
The sanding pad can now be attached to the assembled arbor using a bolt and washer. Attach the pad to a lathe and sand it evenly as it spins, ensuring a smooth and flat front surface.
Preparing the Soft Pad and Velcro
Glue a piece of dense foam onto the sanded pad using high-quality foam glue. Trim the foam round then attach the high-quality velcro onto one side. The basic sanding part is now complete, and you can move on to creating the handle.
Creating the Handle
Make the handle using a scrap piece of hardwood, ensuring the front part matches the dimensions outlined in the templates. Carve out a square section for the carriage bolt to be locked in place, drill a hole for the locking screw, and sand the corners of the handle. Attach the handle to the arbor assembly and ensure it moves smoothly.
Creating and Using Sanding Discs
Buy pre-made hook-and-loop sanding discs or save money by creating them yourself using a hook-and-loop sandpaper roll. Cut out the desired disc sizes, then simply attach them to the velcro side of the soft pad.
The spinning bowl sander offers several advantages over traditional hand sanding. It creates a random pattern of sanding marks, preventing noticeable deep scratches. The continuous motion of the spinning sander also helps clear sanding dust more efficiently, reducing clogging, especially with higher grit sandpapers. Interchangeable dense, medium, and soft pads can be used to prepare for virtually any sanding job on a bowl.
Conclusion
A DIY spinning bowl sander is a simple, cost-effective, and efficient solution for sanding jobs on bowls. With this tool, you can achieve a professional finish without investing in expensive commercial sanding equipment. You can find the free templates in the video description, as well as links to online shops that offer the necessary materials for this project. Happy sanding!
This post may contain affiliate links which means I may receive a commission for purchases made through links. Learn more on my Private Policy page.


I'm so impressed with this tool and your video. I'm surprised I haven't seen any of your work before but I will be looking for more of your projects. You didn't leave out any details and clearly show every step and part. Thanks so much for sharing this.
Uuuuu👌
Fantastic…
great stuff
This is creativity … will done
Thank you very much. I can't wait to make this sander,.and love not having to buy it
Those bearings are not designed for axial loading (like thrust bearings), which you will impart during use. How long do they last in use?
Danke, Marius, das spart mir 70 Euronen
I have been wanting to make one for a year , but held back because of the complexity and expense of most designs . This is so easy and cheap I think I will make up one for every grit paper I use , plus one for the polishing paste . But one quick question , not much is available here for hook and loop paper , for the 400 through 4000 grit wet or dry , do you think I could use double sided tape ?
Excellent job describing everything young man. Keep up the great work.
Thank you!
Thanks for the plans Marius I will be making this for my workshop. Great job
Big like!👍👍👍👍👍✅💪Felicitări! Great video 👍👍👍😎
Very cool, if you can find some steele pipe the same radius as the sanding disk's you require, you can sharpen it to make a punch for cutting sanding disk's out quicker.
😍🙏🙏🙏🙏🙏🙏🙏🙏🙏🙏🙏🙏🙏🙏
Got a "File Not Found" when I tried to download the plans. Would anyone be willing to email them to me?
Just came across this….too bad the link no longer works.
Plans are not available at link provided.
Are the plans in a new location? It tells me they are not available. Thanks
I've just started turning bowls and my biggest problem is getting rid of the ridges caused by the turning tool. I'm sure I can get rid of them by making this tool. Thank you so much for making this video.
awesome!
Wie immer saubere Arbeit!
When I scan the video, I see the video where you scan the video and in that video you scan the video and watch the video where you scan the video….. I can never get to the end now.
Managed to download the plans
I cannot find the link to download the plan
I can not find the printout pages??
Greeeaaatt and good stuff !
And more : super cheap !
Thanks for sharing this idea, and free plan that comes with it !
Take care
Beautiful job. Thank you. I have been looking for a bowl sander. Also the video in the video is a neat trick. You will have to do a video on how you did that.
👍I know old video but hey I am trying to support you lots of info great directions. Take care
Marius this is brilliant! I had to watch the video because I truly cannot be spending the amount of money that these cost in the stores. Thank you so very much for sharing this information with us!
Parabéns!!👏👏👏🇧🇷🇧🇷