This post may contain affiliate links which means I may receive a commission for purchases made through links. Learn more on my Private Policy page.
Introduction – Refinishing a Hardwood Floor with American Sanders
In this article, we will guide you on how to refinish your own hardwood floor using the American Sanders line of equipment. You will learn some tricks of the trade and how to use all the equipment properly. By the time you’re done, you’ll know how to refinish your own hardwood floor.
Determining the Type of Wood Floor You Have
Before getting started on your project, it is necessary to determine what kind of wood floor you have. There are multiple varieties of wood flooring, including solid, prefinished, engineered, and even vinyl. It is essential to identify the type of floor you are working with since only specific types can be sanded and refinished.
Solid Tongue and Groove Style Floors
These floors are usually 3/4 of an inch thick and are meant to last a lifetime. Their thick wear layer allows them to be sanded multiple times during their usable life.
Factory Finished Floors
These floors are also made of solid wood but may have a thinner wear layer than solid wood flooring. This type of flooring can be refinished nicely.
Engineered Floors
These floors look like solid wood flooring but are made up of thin layers of wood laminate glued together. They usually have a very thin wear layer and cannot be sanded and refinished more than once in their lifetime.
Vinyl Flooring
This flooring product is not made of real wood and cannot be refinished through a sanding process.
Inspecting the Condition of Your Floor
Before starting your project, inspect the condition of your floor. Understanding the condition of your floor will help you select the right sanding machine to use. In our example, we are working with an oak floor measuring about 110 square feet in a dining room. The floor is in relatively good condition, which means we can use a drum sander to sand the floor.
Issues of Cupping and Crowning
Cupping and crowning are issues caused by too much or too little humidity in your house. A cupped floor is characterized by the edges of the wood curling up and being higher than the middle of the floor, while a crowned floor has the center higher than the edges. Both of these problems can be addressed temporarily with sanding but will need long-term solutions, such as adjusting humidity levels in your home.
Safety Considerations When Refinishing Your Floor
When working on your floor refinishing project, it is essential to wear safety gear such as eyeglasses, a respirator, hearing protection, and knee protection.
Selecting the Right Rental Equipment for Your Project
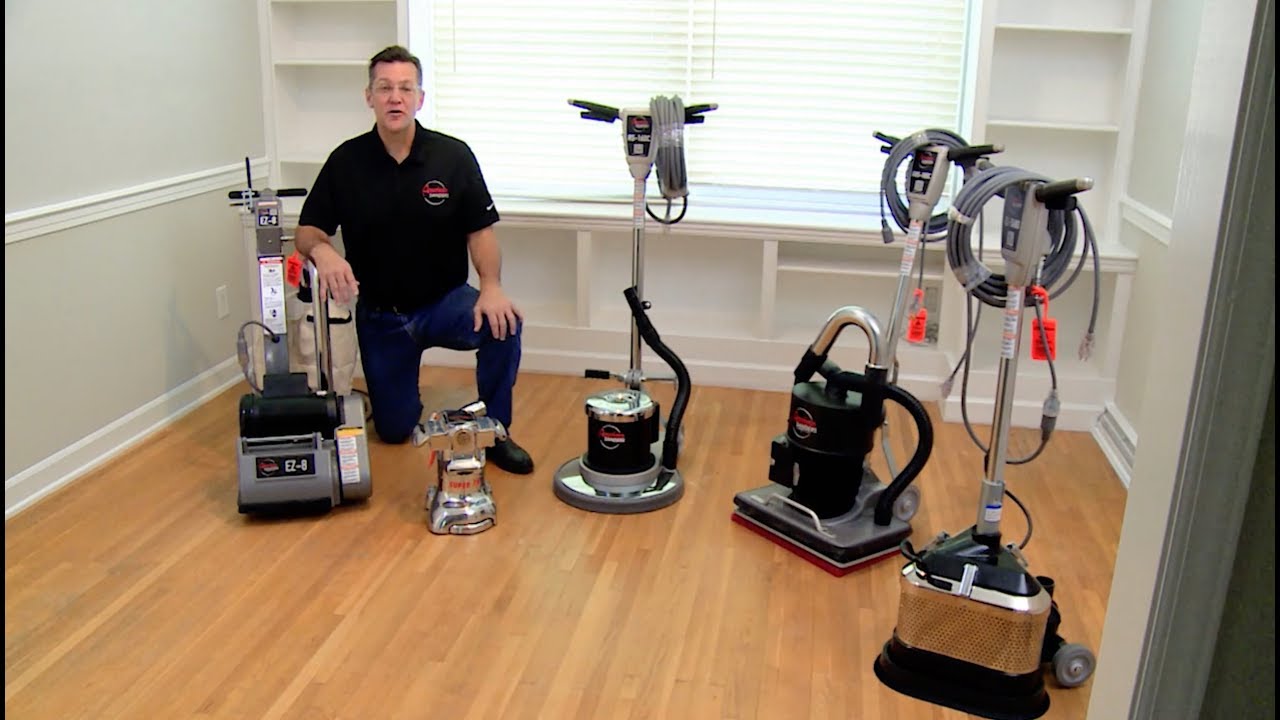
Once you have determined that your floor is suitable for sanding and refinishing, visit a rental center to select the appropriate equipment for your project. Some options include:
Easy A Drum Sander
This aggressive machine will flatten your floor quickly and efficiently. It does require some skill to use but will provide the best results for heavily damaged floors.
Rotary Sander
This sander has a large, flat surface that can flatten your floor but may be slower than a drum sander. It also requires some skill to operate.
Orbital Sander
These easy-to-use machines work in any direction and can be used by anyone. They are slower than drum or rotary sanders but will not damage your floor.
The Sandpaper Selection Process
Start with the finest grit possible that will still sand the floor flat, usually 36 or 40 grit. Next, use a medium grit sandpaper (50 or 60 grit) and then a fine grit sandpaper (80 or 100 grit) to finish the process.
Preparing the Room for Sanding
Before sanding, remove any shoe molding and set all nails below the floor level to avoid damage to the sandpaper and potential imperfections on the floor. Use blue painter’s tape to protect wall corners from power cord damage during sanding.
Sanding Your Floor
It is crucial to sand with the grain of the wood, starting with a rough cut followed by medium and fine cuts. After sanding the main area of the floor with a drum sander or other equipment, use an edger to sand the edges near walls.
Tackling Corners and Fixing Imperfections
Use a handheld scraper to remove leftover finish in corners and blend them into the rest of the floor with sandpaper.
Finishing Your Floor
Before finishing, vacuum and clean the entire floor to remove any debris or dust. Apply a coat of sealer, and allow it to dry according to the manufacturer’s instructions. Lightly sand the floor again, vacuum, and then apply two coats of finish for the desired look.
With these steps, tools, and safety precautions, you can successfully refinish your hardwood floor and enjoy a renewed, beautiful surface in your home.
This post may contain affiliate links which means I may receive a commission for purchases made through links. Learn more on my Private Policy page.


What are the power requirements of the orbital sander ? I have had trouble running it off of a standard outlet
Perfect video , thanks a lot for great products & amazing presentation🏁
So after doing the initial 3 sanding's, you did a 4th sanding with the orbital? Reason I ask is because I have the exact drum sander you're using but I didn't want to have to rent an orbital. Is it really necessary?
American sanders drum sanders are complete garbage if you rent them they are so used and abused and not maintained, so often I rent one get it to the site get it ready go to drop it and it takes 3 with inches off oh my God thats so annoying so now I refuse to use American sanders products. Go get an orbital floor sander from home depot and make your life easier or a drum sander from any other company literally
I want to clean up my office where my feet have worn down an area, is it necessary to have to do the entire room over ?
Do yourself a favor and only buy Lagler paper and always start with 80 grit first, if that doesn’t work, then drop down grit. Starting a project at 36/40 grit is a mistake
Take a shot every time he says trick of the trade
Clamp style drum is a pain in the ass, and sometimes comes loose! lol
Great video! I would add one thing as a furniture restorer, Most stains can be removed or greatly lessened with oxalic acid. Follow directions and rinse well before finishing with fine grit.
Cabinetmaker here.
You can remove stains chemically, most of the chemicals can be dangerous so I'm hesitant to recommend them to those looking for info on YouTube.
Thank you for this video! Which machine do you use to do screen and re-coat? My floor is ok, but I want to refresh it
côté gauche très large! c'est pas intéressant
Hi. thanks for the video. So if i want the natural color of whatever wood floor i have, i don't stain the floor just like you didn't stain the floor in this video. I should only stain it if i want different color rather than the natural wood color of the wood i have? Thank you in advance for answering my question.
Lambs wool pad is better
Wood bleach will take that out
The company I work for here in australia uses 10+ year old super 7r edgers and mate no other edger compares
Can I use a sanding screen instead of sand paper after I apply the seal coat?
What grit should I use after the seal coat?
A mouse sander will make short work of those corners!
I plan on using a Square Buff Floor Sander fro home depot and not remove baseboards. Will this get me close enough to baseboards or will i have to also rent an edging sander?
IMPORTANT BUFFER TIPS: 1. Always keep cord behind you, 2. LOOK to the left and right to see if hitting something HARD will break, even low glass windows and doors!! 3. MOST IMPORTANT: Set handles 3 to 5 inches below your waist because the machine needs to be raised a few inches (before turning on) to level it off or it will SHOOT TO THE RIGHT! 4. Like he said to use the handles, they need very little movement up and down to change directions, REMEMBER: It goes the direction like your car's directional arm……(if you use your turn signals, lol)
These will help the beginner!!!!
19:27 Using Edger
Magari fosse così facile
There’s hundreds of videos about refinishing hardwood floors but what about newly installed unfinished floors . Do you still go with aggressive first cuts or do you maybe start with 80 grit baring the floors is pretty flat and evenly milled planks .
Great video, annoying music.
This video being 28 minutes long intimidates me because I assumed it would be easy
I wanted to get your opinion if you think I can run OBS 180 C machine on my own. I am a 130 pounds lady and I don't if it has any tork? I live very far from any home depot so I would like to know…what you think?
This seems well done and informative.Increasing the playback speed to 1.25 gets you through it faster and doesn't affect the presentation.
You should advertise how to keep the shoes shining when sanding floors.
Really the greatest tutorial video I have ever seen thank u very much
Wow…that water damage screams out in the corner. Shame.
The floor looks great except for the water stain! Why do all that work and leave that awful stain!?
That edger is a human torture machine and if you get it from home depot or any other rental place they will be uneven and hurt your back but as an experienced floor contractor I've done the edge work with an orbital sander and it goes by a bit slower but is still possible to do a great job and not beat up your body with the edger machine.
I was a buffer ranger in the Army. 😂
This guy has style. He refinishes his floors in his penny loafers. LOL
Excellent video. 2 things to add…..the edger is a backbreaking pain in the butt. Very hard on the back on the bigger jobs……you can’t over express the danger of the spontaneous combustion aspect of the dust. I nearly lost my business because of it. The danger is very very real. I refinished floors off and on for 30 years
Um the drum sander and the edger are the first step, FULL STOP, those other three are part of a professional flooring job after you properly sanded and levelled the floor…YOU SHOULD KNOW BETTER! the oscillating ones are for a consistent scratch pattern before applying finish and sanding them afterward. If you try to initially sand your floor with the last three sanders, you will be wasting your time and money. You think 3ft square sand pads are cheap? You will need a bunch!
Awesome video! Sooo, very detail with the instructions. Thank you so much!!
Donde puedo comprar esas maquinas ?
After you mentioned not being able to damage floor with polivac it made me laugh remembering watching a trainee try the polivac first time. It jumped around and left bigger scratches. Was no problem just a laugh
I didn't see he full up the floor crease or hear he talk about that
22:54 🙂
Video is A+, enjoyed it. But to any professionals out there used to a 5HP or 7HP drum … be aware this drum is 1.5 HP. It's basically a complete joke, but they rent it so do it yourselfers can plug it into a wall outlet. Anything worse than a new flat floor don't waste your money renting it. Your better off buying a new 5+ HP machine with some weight to it
useless – does not show the removal process
Refinishing an old stained but reasonably flat floor, it sounded like an orbital sander with a little patient would work using 36, 60 then 80 grids in the initial 3 cycles, then120 between applying polyurethane coats. I like the orbital sander option for people with zero skill like myself, and it can get close to sand the edges. I just need patient?
Hello sir