This post may contain affiliate links which means I may receive a commission for purchases made through links. Learn more on my Private Policy page.
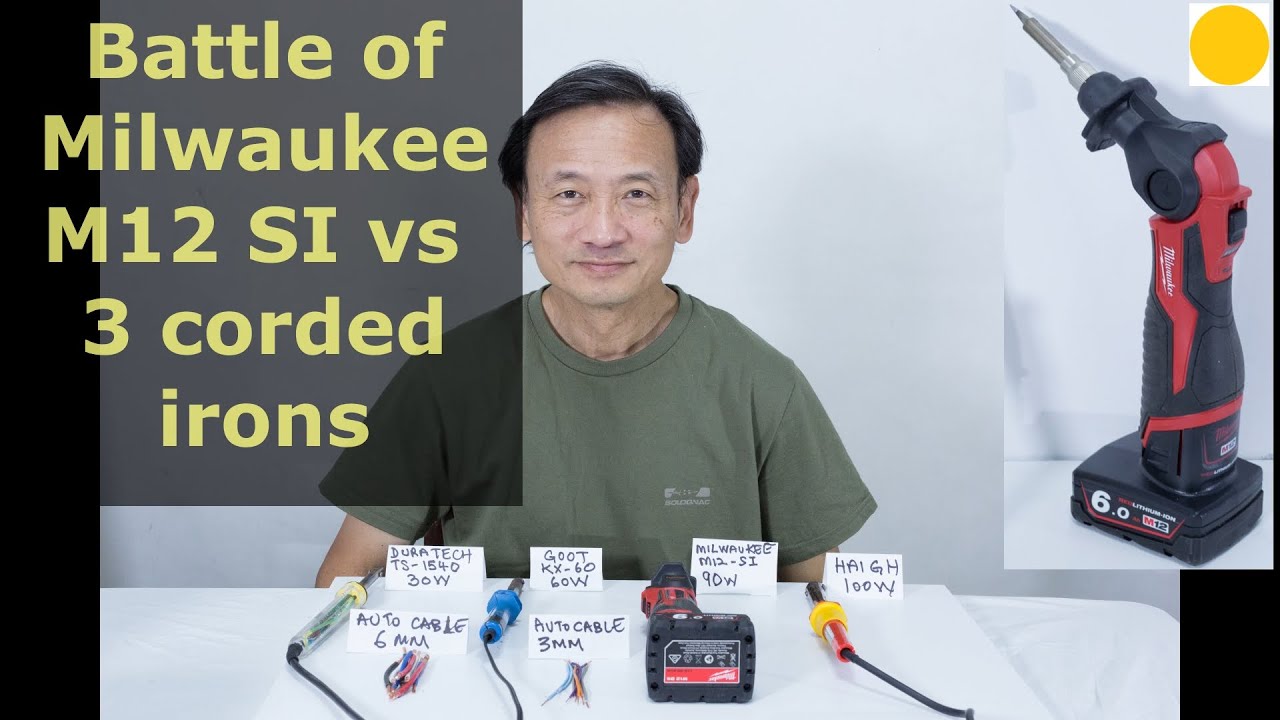
Over the years, I've acquired several soldering irons. You can see them displayed on this table. The first soldering iron I bought was the Goot 60W iron. After that I purchased the high wattage Haigh 100W soldering iron to do thicker wires. Later, I purchased the Duratech 30W soldering iron. It has a little adjustable power. The last & latest soldering iron I acquired is the Milwaukee M12 SI cordless. I decided it was time to buy a cordless because sometimes when you're out in the garage; you're in a workshop; out in a car.
It's much more convenient to have a cordless soldering iron. So I got the Milwaukee M12 SI cordless soldering iron. So in this video, I will compare the Milwaukee cordless soldering iron against the other 3 corded soldering irons I have in front of me. I have prepared some Auto cables. This is a 3MM size & there is a 6MM size – much thicker. The idea is that I want to see how the different soldering irons perform with thin & thicker cables.
So join me in this video, & let's find out together to test how well each of my 4 soldering irons perform on Automotive cables 3MM. I've laid out 3MM cables here. Four of them in 4 different colors. I'll be testing the blue cable with 30W solder iron. Orange cable with 60W iron. Gray cable with Milwaukee M12 cordless 90W iron. Purple cable with 100W soldering iron. The first soldering iron to test is the Duratec TS-1540. Its maximum power is 30W. I've adjusted it to the highest temperature, & that obviously sets it to the highest power rating 30W.
I've turned the power on this 30W soldering iron. So we'll wait for it to get hot. And by the way, all the tips of the 4 soldering irons I filed them so that they're clean for the test. I'm using 60/40 solder 1.2mm thick. Let's begin the test. And this isn't about trying to do a proper solder, or anything for strength. It's just about how suitable the different power rated soldering irons perform on the 3MM Auto cables, & the 6MM Auto cables. Right, that's the 3MM Auto cable using the 30W soldering iron. Works well. See the joint done by the 30W soldering iron – that's pretty good. The second soldering iron to test is the Goot KX-60. It's a 60W soldering iron.
Again I have cleaned the tip by filing it. So let's do the test. Oh! that's very fast. Fast & neat. Done! Fast & neat. I do get the sense that the 60W soldering iron is more than adequate for 3MM Auto cable, & actually the power could be less. For instance, the 30W sufficed. If you're using a 60W like this, you have to be very fast. Otherwise, you'll start melting the insulation. The third soldering iron to test is the Milwaukee M12 SI cordless.
It is rated at 90W power. Before I start using it, let me walk you through some of the features. So the soldering head can be set at 3 positions. Straight up; at an angle; & at 90 degrees. To release it from the lock position, press in. Let go & it will lock into the next position available. The soldering head. It has a replaceable soldering head. So unscrew. that comes off. In fact, the screw assembly comes off. This is just a cylinder. And then the tip. And this is what is the ceramic heating element. So this is fixed anytime you want to change, you replace the head. What comes in the kit is one of these pointed tips, & also a chisel tip. And you can buy the pointed tip & chisel tip as spare parts. Let me put this back. Screw it tight. I've also filed that tip clean. A good design feature of the soldering iron is this fence.
With this fence here, it will not roll so that you can put it on any flat surface
uh this direction or the other doesn't matter that's a good safety feature so it doesn't end
up burning the table, & rolling away as well. It takes the M12 lithium battery. What I have here is a 6Ah M12. It's a bit big for this but that's the smallest size I have. So how you fit it is – goes in there. Nice click. The technical specifications say that with a 2Ah battery, the soldering iron will operate for 45 mins.
So with 6Ah, it's obviously 3 times that. I would suggest if you have 2Ah batteries, it's probably better suited to the soldering iron purely from an ergonomics point of view. Because with the 6Ahr battery, it's very heavy at the back end. Whereas with the 2Ah battery, imagine it's a third of this size. It's much lighter to hold, & operate. Now, how do you operate it. Turning it on is very simple. Just flick that switch on. The red LED shows you the power capacity remaining of the battery. So there was 4 red – so it was good.
When it's blinking green, it means that it's warming up. Once it achieves the operating temperature, it will stay green like this. So now it's good to go. The specification say takes 18 secs to heat up from cold to operating temperature. There's also a LED light at the front end. So whatever object you're pointing at will have some light cast on it. That is useful. So let me pre-solder this one. Rremember this is 90W capacity. Done! Pre-soldered the first part. Let me pre-solder the loose end. Done! That's very fast. Right, now let's solder & join the two. Done – fixed! That is nice & quick as well. So there you go. Nice tight joint – smooth. Flows well. So I like this. I just have to get used to using with the heavy backend battery. It's useful when you're working away from the house; away from 240V or 120V power supply. Or even if you had 240V or 120V power supply available , it's just the convenience it offers being cordless.
Working in cars, sheds, in the backyard. To turn it off, I flick this down. And you see it turns red. What that means is that the soldering iron tip is still hot. So if you see it's red, it gives you a caution that you mustn't touch the tip. When it becomes cold to touch, the light will go off. The fourth & last soldering iron to test is the Hague 100W soldering iron. Again I filed the tip so that it's clean. Let's start by pre-soldering the fixed end of the wire. That was quick being 100W. Now to pre-solder the loose end of the wire. It was quick as well. I think 100W is actually overkill for this job – you can see how fast. And you got to be very quick & careful. All right, let's see how we can join this wires together. Done! More than enough power for this thin cables.
In the next round of tests I have set up 6MM Automotive cables. So this white will be for the 30W soldering iron. Red for the 60W soldering iron. Blue for the 90W Milwaukee M12 cordless soldering iron. And black for the 100W soldering iron. I've also put this 3mm automotive cable here & here – just so you visually have a sense of the difference in size between the 3MM & 6MM automotive cables . In this test, I am expecting that the higher power rated soldering irons will perform better. Providing faster soldering time compared to the lower capacity soldering iron. Let's begin the second round of tests involving the 6MM Automotive cables.
The first soldering iron is this 30W Duratech soldering iron. I've set it to maximum power output. Let's pre-solder this. You see the solder doesn't run all over. You have to be heating different sections because the cable is thick. So if you really want to solder all around, you have to move around the entire wire. But for this demonstration, I'm just gonna solder the top half. Now to pre-solder the loose wire. Yes 30W is not adequate for 6MM Automotive cable I would say. Look at that. The solder just doesn't run… flow. You can do it with 30W soldering iron but it takes a bit of effort. And I can feel the cable getting hot. Let's put a bigger lump on top. Now this isn't how you properly join. You actually twist the cable together. I just want to show the difference between the different soldering irons based on power rating. There you go. It takes a bit effort with the 30W soldering iron when the cable is thicker. So that's it. As I said, I'm not trying to do a perfect join. I haven't soldered the bottom half.
I just don't see how well the solder runs based on different thicknesses of cable, & different power ratings of soldering iron. The second soldering iron test is the Goot 60W soldering iron. Let's pre-solder the fixed end. Oh yes, 60W is much better – more efficient. Much faster flow – much faster. Now as I said before, this test is not about how to do good solders. This is horrible solder. This video is not about how to do good solder it's about how different power rate that soldering irons perform against thin versus thicker cables. So the test is really to see how fast it causes the solder to flow evenly. Right, let me do a pre-solder of the loose end. Was getting too hot for me to hold even with this 60W soldering iron. Look in reality if you're doing a proper soldering job, you intertwine the 2 ends. And it'd be easier to just run the solder through that. But I'm just trying to see how well the solder runs based on the heat capacity of each soldering iron. That's done the solder now.
I'm now powering up the Milwaukee M12 90W soldering iron. It's blinking & now it's stopped flashing, so the soldering iron is now at operating temperature – ready to be used. Let's pre-solder the blue cable. That's nice. That runs very well – very well indeed. Pre-solder the loose end. I've pre-sold that loose ends. Let's see how easy is it to join. There you go. Done! Again I stress I'm not trying to do proper joints. I'm just trying to show how the different power rated soldering irons perform based on different thicknesses of cables. There you go. I think the Milwaukee 90W cordless soldering iron has done very well. Look at that. Very well indeed. In fact, I had less difficulty with the Milwaukee 90W than I had with this 60W corded. I'm gonna turn the Milwaukee off again, & it goes red to show the tip is hot. The fourth & last soldering iron to use is the Haigh 100W soldering iron.
So we'll pre-solder the fixed wire. Done! Now pre-solder the loose end of the black wire. 100W is definitely adequate. And to be frank, I don't think it's actually necessary. Flows nicely with 100W soldering iron. All right, let's join the 2. See how well it flows. Done! Certainly flowed well that time – look at that. So I repeat. This is with the 30W soldering iron; 60W soldering iron; Milwaukee cordless 90W iron; 100W iron. In this video I tested 4 soldering irons. 3 corded soldering irons to power rating 30W, 60W & 100W against the Milwaukee M12 SI 90W cordless soldering iron. In the test, I use 3MM Automotive cables, & 6MM Automotive cables. The test was simply to carry out to see how the different power rated soldering irons performed against thin versus thicker wires; & to see how the solder flows evenly quickly over the copper wires.
Please note it was not a demonstration to show you how to do a proper solder joint of 2 wires. The way I soldered, they were not good joints. As far as I'm concerned the M12 performed very well. The fact that it's cordless means that it's the first soldering iron I pick up to use because of its convenience. I hope you found this video interesting & useful. Do SUBSCRIBE to my channel for more, & to help the channel grow – thank you so much.
This post may contain affiliate links which means I may receive a commission for purchases made through links. Learn more on my Private Policy page.


